Thoroughly washing the exterior using high-quality products. They also apply a wax coat to protect the paint. They pay special attention to areas prone to dirt accumulation, such as the wheel wells and tires.
They use battery-powered tools that allow them to work without relying on the client’s power supply. This makes them self-contained and fully prepared to work on the vehicle anywhere. Visit https://ww.kolbysmobiledetailing.com/ to learn more.
When you book a mobile detailing service, you can expect to receive personalized service that is tailored to your unique needs. This is a significant advantage over in-shop detailing, where technicians must follow a set of standard protocols and cannot always offer the level of personalization that you desire. In addition, mobile detailers are willing to work around your schedule, allowing you to continue with normal life activities while they perform their services.
A professional will inspect the condition of your vehicle’s interior and exterior before starting work, ensuring that you are satisfied with the results. They will also take into account the type of treatment you want, ranging from basic cleaning to more advanced procedures like clay bar treatments and ceramic coatings. In addition, they can also provide advice on how to maintain your car between detailing appointments.
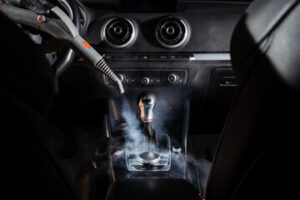
Often, mobile detailers will use ozone machines to eliminate unpleasant odors from your car. These machines work by attaching ozone molecules to odor-causing particles in the air and then breaking them down. This is a safe and effective way to remove bad smells from your car’s interior, which is usually caused by mildew, mold, or other contaminants. In addition, a professional will steam clean the interior of your car and deodorize its vents to make it feel and smell fresher.
Another benefit of mobile car detailing is that the service providers will come to your home or office. This means that you can continue with your daily tasks and focus on what is most important while the professionals treat your car. This is a major advantage over traditional in-shop car detailing, which can require you to leave your house and spend up to 48 hours waiting for your car to be ready.
A good mobile detailer will be friendly and respectful, as well as fully equipped with the tools needed to complete the job. They will also understand the importance of customer service and will strive to meet your needs and expectations. They will also be able to explain the different products and services that they offer, as well as their pricing structure.
Convenience
Mobile detailers bring professional-grade car care to your home or office, making it easy for busy people to get their vehicles in top condition. They use advanced cleaning products and expert techniques to deliver exceptional results that last longer than standard washes. In addition, they offer flexible scheduling options so you can get the care your vehicle needs without disrupting your schedule.
To get the most out of your mobile detailing experience, choose a service provider that offers transparent pricing and convenient payment options. They should also provide detailed service packages so you can compare the different options and find the best value for your needs. Additionally, be sure to ask about any extra charges or specialized treatments that may be included in the price of your service.
Whether you’re looking for an in-depth interior cleaning or a ceramic coating, mobile detailers can help you choose the right services to protect and enhance your vehicle. For example, hydrophobic ceramic coatings repel dirt, make hand washing easier, and keep your paint glossy for the long term. They can also reduce oxidation, enhancing your vehicle’s resale value.
For the ultimate in convenience, choose a mobile auto detailing service that uses battery-operated equipment. These tools are more portable than corded ones and can work in tight spaces where access to power outlets is limited. They can also charge their batteries in between detailing sessions, reducing the need for you to supply them with your own electricity.
In addition to the traditional washing, vacuuming, and wiping down of surfaces, mobile detailing services can also perform steam cleaning and odor removal. This process uses safe, non-toxic chemicals to eliminate lingering bacteria, germs, mildew, and fungus in your vehicle’s interior. It can also be used to disinfect the air conditioning vents and upholstery.
Keeping your vehicle in excellent condition can be a daunting task, especially for busy people. With the convenience of mobile auto detailing, it’s easier than ever to give your car the attention it deserves without taking time away from other tasks. Whether you’re a business owner who wants to impress clients or an everyday driver who needs a reliable and comfortable mode of transportation, mobile detailing can be the perfect solution.
Competitive Pricing
Choosing the right pricing strategy is a critical component to a mobile detailing business’s success. Effective strategies align market trends with internal financial capacity and customer expectations to maximize profits.
The type of service package chosen determines the overall price, and some services have additional costs associated with them. For example, engine bay cleaning and headlight restoration typically have a higher cost than basic cleaning services. Additionally, the use of environmentally safe products usually comes at a premium over traditional chemicals. These higher expenses must be factored into the overall cost of the service in order to maintain profitability.
Location can also influence pricing. For instance, if a detailer is located in Orange County, where there are many other detailing options to choose from, their prices may be more competitive than a service provider operating in an isolated area with few competitors. It is important to carefully research competing businesses in the area before determining pricing.
The adage “you get what you pay for” is especially true in the world of auto detailing. A budget-friendly option may save money upfront, but could end up costing more in the long run if the quality of work is subpar. In contrast, a highly-rated detailing service with experienced professionals can deliver outstanding results for a reasonable price.
In addition to the price of materials, overhead expenses are another factor in determining a detailer’s overall price. This includes licenses, insurance, marketing, and administrative work that is not directly related to client relations. Having a clear understanding of these costs helps mobile detailers accurately predict their profitability and ensures they are able to cover the expense of running their business.
A well-crafted value-based pricing strategy can help detailers increase bookings and minimize objections when it comes to price. Incorporating competitive research, labor rates, and the benefits of high-quality products into the sales process can help a detailer justify their pricing to potential customers. A mobile detailing app like Mobile Tech RX can help detailers create and share detailed quotes and estimates that can cut down on negotiations.
Environmentally Friendly
In addition to the time and energy saving benefits of mobile car detailing, eco-friendly products and methods reduce the environmental impact of your vehicle care. For example, professional detailers use reusable fabric towels and cleaning mitts that do not require disposable paper towels. They also use environmentally friendly cleaning products that do not contain sodium laurel sulfate, an abrasive chemical linked to lung damage. In addition, they often use low-flow water systems that save water while detailing vehicles. This is in stark contrast to the standard car wash process, which uses large quantities of water and can pollute local waterways.
Another way that a premium mobile auto detail service is better for the environment than traditional car wash services is through their expert application of protective coatings to shield the finish from dirt and corrosion. While regular washing can erode paint and lead to premature rust, these protective coatings prevent this degradation and keep the paint glossy for the life of the vehicle.
As the industry evolves, many interior and exterior detailing professionals are incorporating eco-friendly practices into their business. For example, they might use nanotechnology-based products that penetrate surfaces at a molecular level for superior protection and shine. They also may utilize odor-eliminating treatments that use ozone molecules to eliminate unpleasant smells. These services are not available at car washes, where the conveyor belt approach to cleaning can leave your vehicle with an overwhelming odor.
Finally, many mobile auto detailers offer tire ply ratings as part of their car care services. These services provide customers with a valuable tool to measure their tires’ performance and safety. In addition, these ply ratings can help consumers choose the best tires for their driving needs.
In a busy world, the convenience of mobile auto detailing offers a smart solution for maintaining your vehicle. It allows you to focus on your tasks while your car gets the attention it deserves. The detailed results of a professional detailer can also enhance your vehicle’s resale value by demonstrating that you have taken proactive steps to maintain your car.